The guitar truss rod is one of the most important parts of any acoustic or electric guitar because it enables us to adjust the guitar neck accurately for comfortable playing and long-term stability. Not all truss rods are created equally, though, and having the right type of truss rod can give the luthier significant advantages in adjusting the neck while building the guitar and doing the initial fretwork and set-up.
The truss rod’s importance during the guitar’s design and building phases is essential long after the guitar-building is complete. The truss rod’s ability to fine-tune the guitar neck relief (forward or back bow) is a key to maintaining playing comfort and great tone as the guitar neck naturally responds to the changes in its environment, such as humidity, different sets of strings and playing styles.
My hope is that this guide will help you choose the best truss rod for your guitar-building projects as we look closely at each type of truss rod, how they work, and what makes each style different. I’ll also be sharing what I have learned building my handmade guitars over the years, such as how to test your truss rod and how to install it properly.
Lastly, we’ll discuss some tips, techniques and best practices for safely adjusting the truss rod of your guitar to improve or maintain its action, playability and stability for years to come.

How Does A Truss Rod Work?
A truss rod works by bending forward or backward inside the guitar’s neck when the adjustment nut is tightened or loosened (which way to turn a truss rod). On the most basic level, it can help to counteract the guitar strings’ pull as they will cause the neck to bow forward when they tuned up to pitch. But having a perfectly straight guitar neck is not optimal either. Having a very subtle forward bow to the neck is optimal for low and comfortable string action (we want the strings close to the tops of the fret wire for comfortable playing, but not so close that the strings buzz against them when in motion). The truss rod helps make the subtly adjust the neck bow to find a perfect balance and the sweet spot of playing comfort and a great-sounding guitar.
Main Types Of Guitar Truss Rods
(How To Choose)
There are several types of truss rods that I have come across over the years but in this article, we will be focusing on the two main types that you will find in most guitars that you adjust or build.

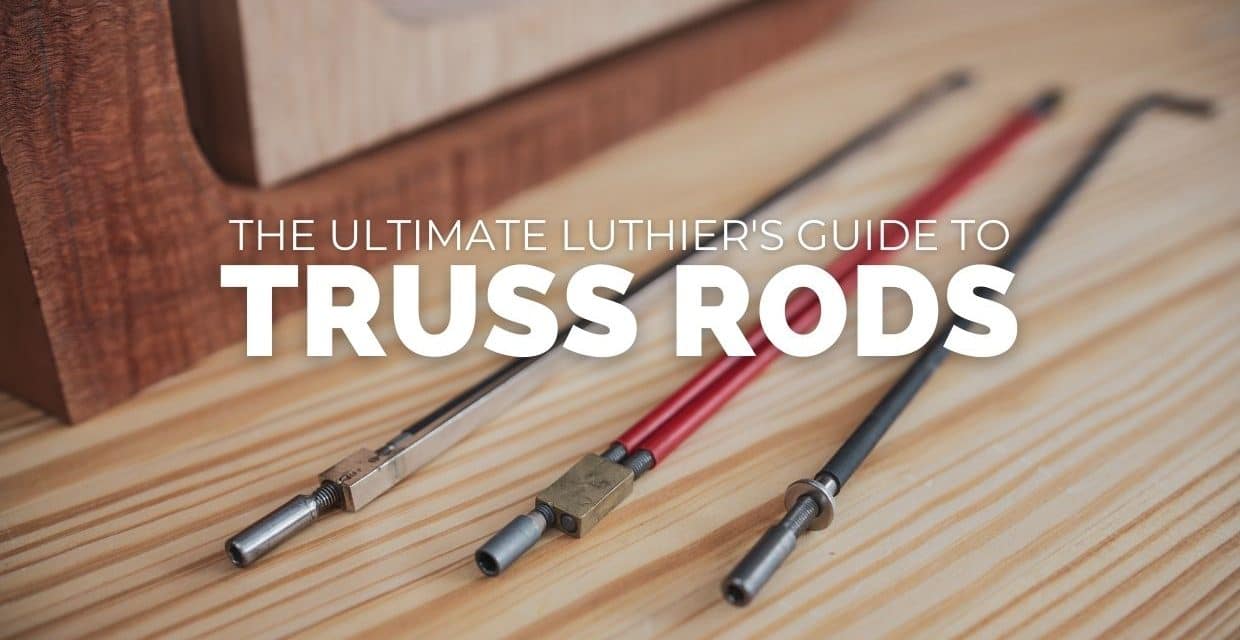
Single-Action Truss Rod (Compression Rod)
This type of truss rod usually consists of a single piece of steel that is threaded on one end to receive an adjustment nut and washer, and on the other end, it may be threaded on one side to receive an anchor bolt or bent into an L-shape.
These single-action truss rods must be inlaid into a curved slot in the neck so that when the rod is tightened at the nut, it wants to straighten out, exerting a force that pulls against the tension of the strings and helps to relieve the forward bow induced naturally into the neck by the tension of the strings tuned up to pitch. This type of truss rod can only bend the neck back and can not induce forward bow like some other types.
Pros
- Lightweight
- More wood left in the neck
Cons
- Affected greatly by variations in wood density
- No forward adjustment
- More affected by relative humidity


Dual-Action Truss Rod (Two-Way Rod)
A dual action or double-action guitar truss rod comes in several different forms, all sharing one thing in common: the addition of a second rod or metal bar above the main truss rod.
The top bar is somehow fixed in length, and the lower bar is threaded on each end to allow it to expand or contract in length, based on which direction the nut is turned while adjusting the truss rod. The adjustment nut is usually welded or somehow permanently fixed to the end of the lower rod to allow for precise adjustments. Better rods have threads designed for smooth and even adjustments to help get the neck bow just right.
Pros
- Not dependent on wood density
- Two-way adjustment (forward and back)
- More stable than single compression rod
Cons
Weighs more
Requires more wood to be removed
- Adjusting nut is attached and if damaged can not be replaced
I have seen a few other variations over the years, but these are the main styles that I have the most personal experience using in my work.


Choosing The Right Truss Rod For Your Guitar
When I began building archtop guitars, I started in the traditional way, at least in the area of neck design. I used a standard single-action truss rod. The great thing about this type of truss rod is that it is very lightweight and allows the upper part of the channel to be routed into the neck to be filled back in with wood. This not only adds as little weight to the neck as possible, but it can also sometimes keep the tone sounding more woody and natural.

I quickly found out that this truss rod is much more susceptible to the changes in its environment’s humidity. Because this rod is compressing the wood as the nut is tightened, it is vulnerable to being affected (more than other types of truss rods) if the wood changes dimension over time due to compression or in response to its environment. Wood constantly does change dimensionally as it absorbs and loses moisture based on the relative humidity it is exposed to.
The wood in the neck itself functions as part of the truss rod system with the single-action truss rod. The nut is tightened against the wood. If the wood expands because the humidity increases, that’s equivalent to tightening the nut on the truss rod and can cause the neck to move. Most of the time, these movements are subtle. Still, when the guitar has very low action, it can be quite noticeable to a discerning player if the humidity fluctuates a great deal and could even lead to annoying fret buzz or high action, depending on the humidity level present.
Not only that, but because wood is always different in density and strength, with a truss rod that relies on the wood itself as part of the system, the neck’s stability becomes a bit of a gamble. If the wood near the adjustment nut starts to crush under pressure, it can become impossible to make any adjustments to the neck.

Obviously, the wood provides most of the strength as the neck supports the string tension, but the truss rod must be there to provide consistent adjustment and stability. Because the wood is constantly fluctuating, I began to feel like it was a bit too risky using this type of truss rod, never knowing exactly how the neck would respond over time.
I switched to using a double-action truss rod, but with one-way adjustability at first (shown above, left). This was instantly a big improvement in adjustability. But still, it only provided me with the ability to move the neck back against the string tension. And it was much heavier too. Being the crazy perfectionist that I am, I wanted control of the neck in the forward direction as well. I use this forward bow feature most during the guitar-building process to get the neck perfect for fingerboard leveling and fretwork, which I discuss in my online guitar-making course.
Many people only use and love the single-action truss rod. It’s probably in more guitars than any other type—I just wanted to point that out because what I’m sharing here is my own personal opinion and experience. You might find it’s perfect for your guitar, and that a more traditional type of single-action compression truss rod fits you and your style just fine.
My Favorite Truss Rods

Allied Lutherie Double Action Truss Rod – Weight: 119 grams (14″ Length)
The double-action two-way truss rod is my preference (also known as dual-action truss rod). There are two specific truss rods of this style that I like very much. One design I really like is the Flex Strong truss rod from Allied Lutherie (above) and LMI—though they are slightly different, the overall design is similar. The latest version from Allied Lutherie is lovely and very high quality. The adjustment capabilities are very fine and work great, BUT it weighs a little bit more than the next one I’ll be showing you (not really a big deal at all though). I loved the design of this so much that I looked into having this rod made out of titanium to get the great adjustment AND light weight, but it’s patented, and it costs a lot to get them made out of the right type of titanium that really does weigh less and has the right strength.

My favorite truss rod and the one I currently use is made by Stewart-MacDonald: The Hot Rod (above). This truss rod is lighter than the Allied Lutherie rod, and I also like the fact that the upper and lower bar are threaded into the nuts that connect them. I have always had a small nagging concern about the welded parts one day breaking on the other types of rods that I have seen. With the Hot Rod, I don’t have to worry about that.
So the StewMac Hot Rod gives me the best balance of great adjustability both forward and backward, plus it’s the lightest double-action rod I have used so far. I have my eye on this low profile truss rod to try soon as I think it might be even lighter. If I do, I’ll update this article so be sure to subscribe to our email list if you haven’t yet to stay informed.
4 Tips For Proper Dual-Action Truss Rod Installation
1 – Preventing Truss Rod buzz
 One thing to mention, though, is that double-action truss rods can buzz in the neck (vibrate sympathetically) when there is no tension on them, if not installed right. Thankfully, I have never had any problems on a finished guitar, but it is something to be sure you do properly when installing the rod. StewMac.com has some good info on how to do it right—Installation Instructions. The only thing I add to their steps is that I put some silicone in the middle of the rod slot, and in between the rods themselves in the center as well, to keep those areas quiet too, just in case.
I have been using the Hot Rods from StewMac in conjunction with two carbon fiber reinforcement rods for over 20 years. They have been great at keeping my guitar necks stable and resistant to fluctuation from string tension or changes in humidity. You can check out some computer printouts of my fingerboard and fretwork as scanned by a PLEK laser. The PLEK returned a report that the fingerboard was perfect and needed no adjustments on two of my scanned guitars. Both of those guitars used the Hot Rod truss rod. You can see the printout and learn more about how I am able to accomplish a perfect set-up in my online guitar physics and set-up course.
2 – Leave Enough Room For The Adjustment Nut
One other subtle yet important tip to add here is that when you are making the truss rod access cavity, it is critical to make sure there is some extra space around the adjusting nut, even if you are using the Allen nut version of the rod. This is because when the rod is tightened to pull the neck back against the string tension, the rod can bow just a bit. If the nut is resting on the wood in the truss rod adjustment slot, it can apply pressure to the nut and result in a buzzing sound and, in the worst case, can even break the nut’s weld, rendering the rod useless. So be sure to make some extra space below the nut so it can flex back a little bit under tension without hitting the wood.
3 – Testing your truss rods before use
I always test the truss rods before I install them into the guitar neck. If there is any chance of the guitar truss rod breaking, I want it to happen BEFORE installing it into the neck and finishing the guitar. All I do is route a slot into some scrap wood and temporarily insert the double-action truss rod into it. I cover it with some other scrap wood and clamp it in place, leaving the nut exposed. Then I give it a good tightening, applying about as much pressure or maybe a tiny bit more than I anticipate it would ever have in the actual guitar. If they pass this test, they are cleared to be used in upcoming guitar builds. Just as a side note: I have never had one break during testing, but I have heard tragic stories from other luthiers who did not do the testing step and had a rod break inside the neck, which is never a good thing.

4 – Make sure the rod fits your guitar neck profile
One thing I also do if I am making a new neck profile or using a new type of truss rod is to make a full-scale neck profile cross-section drawing. It is just a simple way to make sure there will be enough neck material below the truss rod cavity before I start building. It is much better to find out now on paper that your truss rod is too deep than to discover it by carving through into the truss rod while you’re working and ruin the neck. I talk a lot about the importance of, and how to make, full-scale guitar drawings in the Luthier’s EDGE course—The art of guitar design.
Guitar Truss Rod Adjustment Tips
 Only use the correct truss rod adjustment tool—Be sure the truss rod adjustment tool (Allen key, truss rod wrench, etc.) you are using is the proper size. If it’s close but not perfect, don’t use it. If you strip out the nut, you won’t be able to adjust the rod anymore, and it could be very difficult to fix.
- Mark the current location—Use a marker to put a line on the top of the nut, so you will know where you started from. This works as a reference for how much you turned the nut and also a way to abort the mission if you need to go back to where it was.
- Adjust in small amounts—A truss rod can break, so it’s important to take your time and work in small steps. Make a 1/4 turn, then wait a while because the neck may respond slowly to the new pressure from the truss rod. You do not want a shocking amount of stress suddenly applied; you want the wood to adjust to its new situation gradually.
- Do not accidentally torque the adjustment nut to the side—Only turn it gently clockwise or counterclockwise. Any torque to the side could bend or even break off the adjusting nut, if it is a welded nut double-action design.
How To Adjust A Guitar Truss Rod
Should you tighten or loosen your truss rod? Regardless of whether you are adjusting an acoustic guitar or electric guitar, the truss rod adjustment itself is straightforward. Remember “righty tighty” and “lefty loosey”? That pretty much sums it up.


- Too much forward bow (high action)—In this case, you will need to gently and slowly tighten the truss rod (turning the nut clockwise). This will bring the neck backward and begin to straighten out the fingerboard surface and should result in the strings feeling closer to the frets (lowering the action) and increasing the ease of playing and comfort.
- Strings buzzing on the frets (low action)—This usually means the neck might have some back bow in it. In this case, you will want to slowly and gently, in small increments, loosen the truss rod. This should let the neck begin to bow forward under the string tension and give the strings more room to vibrate without buzzing against the frets. Give it some time to respond, though, as mentioned before.
How To Get More Help For Your Luthier Projects
If you made it this far, you should now understand what a truss rod is, why it is so important, and which one is the best fit for your guitar. When it comes to adjusting, be sure to keep those guidelines in mind and take it slow and gentle, allowing the neck to react over a few hours or more if needed before making more changes … and always use the right tool for the job.
If you still need some help, consider joining the Luthier’s EDGE online guitar school, where I can help you personally with truss rods and any other luthier questions you might have. CLICK BELOW TO LEARN MORE


I make my own truss rods, they are single action. But, are made like the double action. I need to find out how to make them into double action. If you folks would point me in the right direction I’d appreciate it very much.
Mike.
Hi Mike, the double action rod is threaded on both ends of the rod that turns (with opposite threads on each end). That way it can bow the neck backward to counteract string force when turned in the usual direction, but then when turned the opposite direction it will cause the neck to bow forward too.
For me this is important when I do the fret work, so that I have full control of how I set the neck before filing the frets when I am doing the setup. I like to use the frets to make the neck strong by making the tang fit tightly into the fret slots. This can sometimes cause the neck to bow backward just a little bit, but with the double action rod, I can bring it back to the perfect position to do my fretwork and set up.
Tom
Hi Tom. The problem I’ve always had with the double truss rod, the hot rod in particular is I had no way to control where the hump would bend up or down. Many times the rise would happen up around the 10th fret or even higher. Even though I used it for years when I would adjust I could never get the critical adjustment at the fret seven or around. So I went back to the single truss rod with the groove sloped in the area where I needed the rise to get exact playability on the neck.
I’m curious as to how you control where the trust bar dips or rises on your neck.
I love builders who are generous with their knowledge. As it wasn’t that long ago that everything was secret society…remember? Anyway, what you’ve written and what you’re doing for the improvement of guitars and the future builders is great.
Hey Thanks Randy,
I try to just use the rod to get the neck back to the curve I need. So I really don’t use the rod to bend the neck which makes the bump less of an issue. I build the neck so that it has the curve I want built into it already, in the main neck/fingerboard joint, sanded into the fingerboard surface, and fretwork too. So the truss rod just helps to get it back to its original shape not really bending it or shaping it further.
I know that’s not the best answer because it is tricky and can sometimes result in a bump where you don’t want it, but for me it’s been about the anticipation and pre-working the fingerboard surface to counteract those little things so they are never a problem.
Remember also that fret 12 is the point of widest oscillation for the string so it should also be the deepest point in the subtle curve of the playing surface too. You can see more about how I think about that here: https://theartoflutherie.com/guitar-care-and-maintenace-101-video-course/#a2
Thanks again! Tom
Have you ever had any experience with warmoth? I’m curious about the type of dual-action truss rod they use in their modern necks. Many people complain about its weight, so I wonder what type of truss rod they use.
Hi Peter,
No I haven’t had any experience with those, I be you could search around to find out what they use or even call them. Keep in mind, weight isn’t always bad, some people want some weight in there to help with sustain. I just prefer the truss rod a little lighter for my guitars because it helps my guitars feel more balanced overall and not so neck heavy because I build the body pretty light. – Tom
Hi Tom,
I have used the hot rod truss rods in all my guitars until recently. I had a hot rod break on a finished guitar. The 4mm nut broke off at the weld. StewMac replaced it at no charge but the neck was a complete loss. Trying the allied rod next.
Hey Matt, man sorry to hear that! I appreciate you sharing that here, it could be important to help people deciding which truss rod to use on their next guitar. Thankfully, I have never had that issue, but I have heard of rare cases where it did happen to others. Let me know how it goes with those new truss rods. (I’d love to know your take on how strong they are, how much they weigh in comparison, etc.) Maybe we need to add them to the list here on this page? As I a writing this, I think maybe I just nee to get some and do some testing myself too, now I’m curious 🙂 Anyway, I hope it goes well and turn around for you and you are able to quickly get that guitar back in proper shape. If I can be of any help don’t hesitate to let me know.
Great article Tom, thanks! One thing I would add to the “cons” of a double acting truss rod though: I’ve set up thousands of instruments, and in the real world people strip truss rod nuts. Very often, with a traditional truss rod, it’s possible to extract that nut and install a replacement. With a double-acting truss rod, you’re done. It’s a serious consideration for me.
As a newbie, and I mean newbie guitar player, the learning of what makes my instrument sound as sweet as she does and how to properly maintain her is paramount. Tom, I just have to say, “Thanks!” It means a great deal to those of us not only to play a fine guitar, but also how they are made, and how everything comes together. This has been extremely informative and taught me more than I have read everywhere else. Rock on!
Which direction is the truss rod turned when going from 11 gauge strings to 10 gauge strings? Thanks!
Hey Frank, Going to lighter strings will make the neck bow back, so you would want to loosen it to let it come forward a little now since it has less tension on it with the 10s. Some truss rods can be different, but in most cases, if you want to let the neck bow forward more, you would loosen the truss rod by turning counterclockwise. Just a little bit at a time, less than 1/4 turn can make a big difference, so take it slow. I hope that is helpful and let me know if you have any other questions.